
How to Install Invisirail Glass Clamps

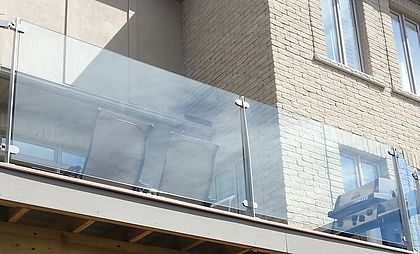
Have you ever thought about installing a glass railing system in your home? Well, it certainly makes sense. Glass railing adds a touch of elegance and class to any indoor or outdoor space. It has become the ultimate choice for those who are looking for modern and luxurious décor for their homes.
But most people don’t think about what goes into setting up a structurally sound glass railing. Obviously, the most important component would be the glass panels themselves. That’s because the glass panels make up the largest part of the railing system’s structure. But there are many other components that you will need when installing your new railing system. These include the posts, spacers, and clamps. And if you’re installing a glass staircase railing, a handrail will come in handy.
The most attractive feature of glass railings is the promise of truly uninterrupted views. That could explain why glass rail clamps have become so popular. A glass clamp is the best way to provide a glass railing while ensuring that the view remains open and uninterrupted at the same time. And even better? They are incredibly easy to install and can be used with either standard Invisiposts or wooden posts.
If you want to set up a new glass railing system for your home, it’s a good idea to find out everything you can about the hardware requirements. That way, you don’t end up making mistakes that will cost you a lot of time and money. So, with that in mind, here is everything you need to know about glass rail clamps.
Featured Products

What do Glass Rail Clamps Do?
Using a glass clamp is the perfect solution when installing glass railings, staircases, and partitions. It allows you to hold and secure a glass panel firmly without having to drill any holes in the panel. Simply put, glass rail clamps provide a quick and easy way to secure glass panels to baluster posts.
Most importantly, glass rail clamps allow you to do all this while maintaining a pristine, uninterrupted view. They help to create the impression of a floating glass railing. Furthermore, they can be used to effectively secure both tempered and laminated glass panels. You can even use them in conjunction with an Invisirail adaptor to set up panels at anything between zero to 90-degree angles.
Features of Glass Rail Clamps
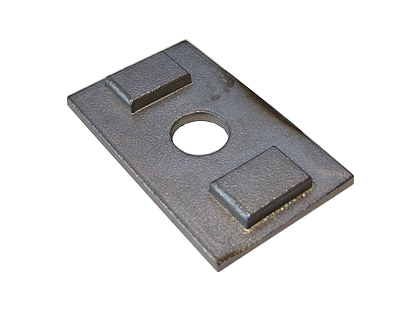
When setting up a glass railing system, glass rail clamps are a great way to ensure that your views stay uninterrupted. They are small, lightweight stainless steel brackets that you use to install a glass panel onto a rail support post. Typically, glass rail clamps are compatible with panels that are between eight to 12mm thick.
They are also quite strong. Glass rail clamps from Invisirail are lined with a rubber gasket. This helps to provide extra gripping power, ensuring that each glass panel is held securely. They also come with an adjustable screw to provide extra holding power. A security pin is also provided for additional support.
Since they are made out of stainless steel, glass connectors and clamps are very durable. They do not corrode or rust. This means that they can be used in any climatic or weather condition without any risk in the long run.
They can also be used for a wide range of applications – from outdoor deck railings to staircases. In the latter case, you will also need to work with specialized glass handrail clamps.
They are easy to install and suitable for use with Invisiposts or wooden rail posts. Glass rail clamps can be used to install decking of any length. You can also use them to install railing over steep or gentle slopes too.
Types of Glass Clamp
There are a few different types of glass rail clamps that you can choose from. However, your choice will depend on the particular need of your project. These include:
- Clamp for 8mm Glass
- Clamp for 10mm Glass
- Clamp for 12mm Glass
Ideally, you should use the right sized glass clamp to install a glass panel of the respective thickness. This is the only way to ensure a perfect fit. Using the right glass clamp will keep your glass panels secured safely to the rest of your railing system.
You can also use the appropriate spacer when setting up your railing system. These spacers fit in well between the glass clamp and post, giving you a greater degree of versatility when it comes to deck size. They also ensure that air flows efficiently throughout your deck or indoor space.
Glass Clamp Installation – A Detailed Guide
Installing glass rail clamps is a simple, straightforward process. However, it usually involves at least two people to ensure a safe installation process. You should also make sure that you are properly kitted out with proper protective equipment at all times. This should include work gloves and safety glasses at the very least.
Also, you should avoid ordering your glass panels before installing the posts. This way, you will be able to take the exact measurements for the panels that you need.
It might also be a good idea to remember that a glass clamp is designed to fit by compression. If you use the right one, you might not need to use any safety pins. That said, it is recommended that you use them, just to ensure a strong and secure connection. Keep this in mind so that you can get glass panels that take these pins into consideration.
Required Tools:
- Tape measure
- Bolts
- Drill bits with various drill bit sizes
- Door shims (to help you with fine height adjustments)
- 2 short 2×4 pieces of wood (to help support the glass panel)
Part 1 – Installing the Posts
- Glass rail clamps are made up of two parts – the top and bottom brackets.
- Start off by disassembling your glass clamp.
- You can get rid of the nylon pin and bushing. You won’t need them at this point. But this only applies to the top bracket.
- Use a #14×2.5 stainless steel lag screws for the top bracket. You can pre-drill a pilot if you are using material that is very hard.
- Note that the top bracket should be installed at least 39.5 inches above the deck surface if you want a rail height of 42 inches. In case you want a 36-inch high rail, install the bracket at 33.5 inches.
- Also, avoid tightening the lags too much. This will cause stripping. Instead, make the glass clamp snug enough to still be turned by hand force.
- Ensure that you make the bracket as close to plumb as possible.
Part 3 – Installing the Bottom Bracket
- Disassemble two sets of the glass clamp halves. This time, keep the nylon bushing and pin.
- At 6.125 inches above the deck, drill a 3/8 inch hole through your railing post. Ensure that this hole is parallel to the deck surface. If you want to ensure better accuracy, drill halfway through each side. Then, drill through this hole in one pass.
- Insert a bolt through the bracket half. Then, use a bolt to push through the hole that you made in the post.
- Then, put the other half of the bracket onto the bolt. Secure your connection with a nut until it is snug. You can use a ¼-inch drive to tighten the bolt and brackets.
- When installing the glass clamp in a corner, you will use only one side of the bracket. Set your drilled hole slightly offset, or angled slightly upwards or downwards. This will ensure that the bolts you use at the corner will clear each other. Use a support plate, or washer and acorn nut, to secure the side that doesn’t have a bracket.
Part 4 – Installing the Glass
- Place two short 2×4 or 4×4 wood pieces on the deck surface and use them to help secure your glass during the installation process.
- Locate the right glass panel that you want to install. Each Invisirail panel will be exactly 1¾ inches short of the opening size.
- Carefully place the glass panel into position and support it using your short wood pieces.
- Start off by fastening the top brackets first. This will help hold the glass panel in position.
- Take the other half of the glass clamp and slide it onto the bracket half that you have already installed.
- Then, tighten the screws enough, but avoid stripping them.
- In case your glass clamp doesn’t slide easily onto the installed sections, then make sure that it hasn’t been over-tightened. This will only cause the two halves to misalign.
- Install the nylon bushing and pin into the bottom half that is already installed in the post.
- When you’re done, all the glass clamp plates should be parallel to each other. The screws should be completely tightened too.
Wrapping Up…
Glass rail clamps are a necessary part of any glass railing system. They are easy to use and install, ensuring that your new railing stays secure and protected. Make sure to check out all the options that are available before starting your next home improvement project.

